
Flowers
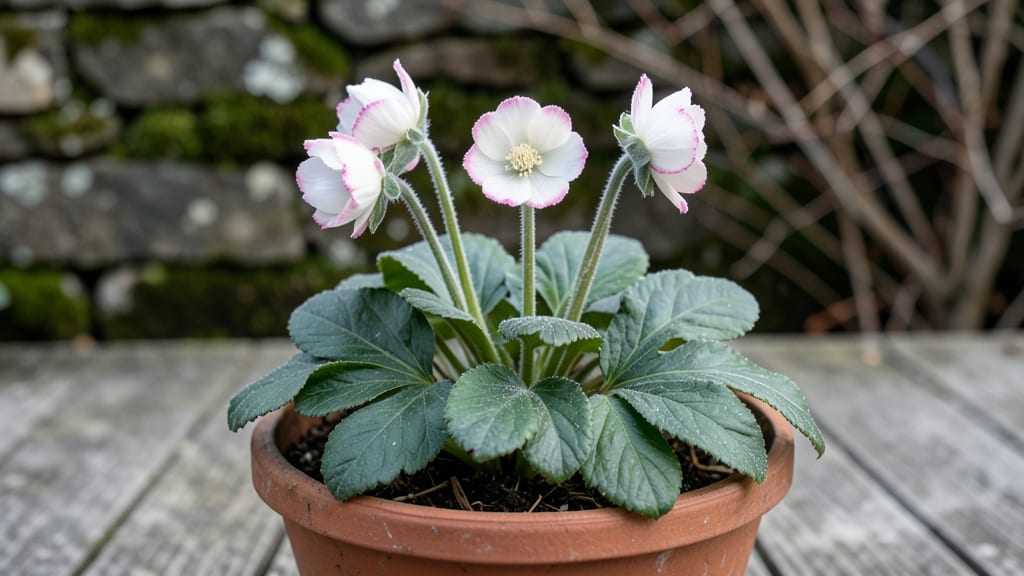
The helleborus "Ice 'N Roses Picotee" steals the winter garden with its pale pink blooms edged in crisp white—frost-proof and utterly enchanting. 🌸 I first fell for their delicate, almost edible petals when they bloomed in my shady... border during a January thaw, proving winter doesn't have to be a monochrome season. These aren't just flowers; they're the star of a year-round show, with glossy evergreen foliage that adds texture even when not in bloom.
The picotee edges create a striking contrast that makes them perfect for cottage gardens, woodland escapes, or as a focal point in shady borders.
Pair them with ferns, hostas, or heucheras for a lush, layered look, or let them stand out against dark evergreens like Inkberry holly for a bold statement. Their 6-8 inch height makes them ideal for front-of-border planting, where their delicate blooms catch the eye without overwhelming smaller perennials.
What you'll love most is how they bloom in late winter to early spring, often while snow still lingers. The petals' waxy texture and subtle fragrance make them irresistible to pollinators, and their disease-resistant nature means less fuss than many spring flowers.
A single clump multiplies over time, creating natural drifts that feel effortless yet polished—exactly the kind of "I woke up and it was beautiful" magic gardeners crave.
For maximum impact, group them in odd-numbered clusters (3, 5, or 7 plants) to create movement in the garden. They thrive in partial to full shade, making them a lifesaver for tricky spots under trees or along north-facing walls.
Add spring bulbs like snowdrops or grape hyacinths at their feet for a layered, ever-evolving display—proof that winter gardens can be as vibrant as they are resilient.
📚 In This Guide
- What you need
- Instructions
- Tips and common mistakes
- Wrapping up and next steps
What you need
- ● Helleborus 'Ice 'N Roses Picotee' plants or seeds – Choose from nursery-grown plants (preferred for faster blooms) or seeds (slower but fun for experimentation). For mature plants, 3–5 specimens will create a stunning display.
- ● Well-draining potting mix or garden soil – Amend with compost (20–30%) and perlite or coarse sand (10–15%) to prevent soggy roots. Helleborus hates wet feet!
- ● Containers or garden bed – Containers: 12–16" pots with drainage holes (1 plant per pot). Terracotta or fabric pots work best.
- ● Garden beds: Partial to full shade with loamy, humus-rich soil (pH 6.0–7.5). Avoid heavy clay.
- ● Mulch – Organic mulch (2–3" layer of shredded bark or leaf mold) to retain moisture and regulate soil temp.
- ● Garden trowel or transplant spade – For digging holes (2–3x wider than the root ball).
- ● Pruners or clean scissors – To trim dead foliage or spent blooms after flowering.
- ● Watering can or hose with gentle spray nozzle – Helleborus prefers consistent moisture but hates soggy soil.
- ○ Gloves (optional but recommended) – Protects hands from mildly irritating sap and thorns.
- ○ Fertilizer (optional) – Balanced slow-release fertilizer (10-10-10) in early spring only if soil is nutrient-poor.
- ● Avoid high-nitrogen fertilizers—they promote leafy growth at the expense of blooms.
- ● Best planting time: Fall (September–October) for outdoor planting (allows roots to establish before winter). Spring (March–April) for container growing.
- ● Hardiness: USDA Zones 3–9. Thrives in cool climates but tolerates brief summer heat if shaded.
- ● Light requirements: Partial to full shade (morning sun + afternoon shade ideal). Avoid harsh afternoon rays.
Step-by-Step guide to planting and caring for Helleborus 'Ice 'N Roses Picotee
This frost-hardy beauty thrives with minimal fuss once you nail a few key details.
🌱 Step 1: Select the Perfect Planting Location
Helleborus 'Ice 'N Roses Picotee craves partial to full shade—think dappled sunlight under deciduous trees or filtered light on a north-facing border. I always plant mine where they’ll receive morning sun but afternoon shade, especially in hotter climates. The key is avoiding intense midday rays, which can scorch the delicate petals.
Choose a spot with well-draining soil—these perennials despise soggy roots. If your soil is heavy clay, amend it with 2-3 inches of compost mixed into the top 12 inches of soil. Test drainage by digging a hole, filling it with water, and watching how quickly it drains. If it pools after 30 minutes, you’ll need to improve drainage further.
🪴 Step 2: Plant at the Right Depth and Spacing
Dig a hole twice as wide as the root ball but only as deep as the container’s root zone—planting too deep suffocates the crown. Gently remove the hellebore from its pot and loosen any circling roots with your fingers. This prevents girdling as the plant establishes.
Space plants 12-18 inches apart to allow for mature growth while maintaining airflow. The picotee edges on these blooms make them stand out, so give them room to shine without competition. Backfill with native soil mixed with a handful of bone meal (about 1 tablespoon per plant) to encourage strong root development. Water deeply to settle the soil.
☀️ Step 3: Mulch and Water for Establishment
Spread 2-3 inches of organic mulch (like shredded bark or leaf mold) around the base, keeping it 2 inches away from the stem to prevent rot. Mulching in early fall helps insulate roots through winter, while spring applications retain moisture. I always use light-colored mulch to reflect heat and reduce soil temperature fluctuations.
Water deeply once a week during the first growing season, aiming for 1 inch of water per week. Check moisture by sticking your finger 2 inches into the soil—if it’s dry, water again. Avoid overhead sprinkling, which can cause fungal issues. Instead, use a soaker hose or water at the base. Once established, hellebores are drought-tolerant but will reward you with more blooms if kept consistently moist.
✂️ Step 4: Prune and Maintain for Long-Term Blooms
Deadhead spent blooms in early spring (before new growth emerges) to redirect energy into fresh flowers. I use clean, sharp pruners to snip stems just above the first set of leaves, which encourages bushier growth. Avoid cutting into old foliage—it provides winter protection and photosynthesizes even when dormant.
Fertilize lightly in early spring with a balanced 10-10-10 fertilizer (about ½ teaspoon per plant). Too much nitrogen promotes leafy growth at the expense of blooms. Divide clumps every 3-4 years in early fall if they become overcrowded, splitting carefully to preserve the central crown. Replant divisions immediately in prepared soil.
⏰ Step 5: Protect and Prepare for Winter
Helleborus 'Ice 'N Roses Picotee is hardy to USDA Zone 3, but a thick layer of mulch (up to 4 inches) in late fall adds extra insulation. I often top-dress with straw or evergreen boughs in colder regions to shield against freezing winds. The picotee petals can look frosted in winter, but they’ll bounce back with spring’s warmth.
Resist the urge to cut back old foliage until late spring—it shields new shoots from late frosts. Once new growth appears (usually by mid-March in most zones), trim any remaining dead leaves to make room for fresh blooms. This variety often flowers as early as January, so patience pays off with months of color before spring bulbs even wake up.
Tips & tricks for perfect Helleborus planting and care
These subtle details make all the difference between a struggling hellebore and one that thrives year after year.
Soil Test Matters: Before planting, I always do a quick soil test using the 30-minute water drainage trick mentioned in Step 1. If water pools after 30 minutes, I mix in 1 part perlite to 3 parts soil by volume to improve aeration. Hellebores can't tolerate soggy roots—this simple test prevents future rot issues. For heavy clay soils, I also work in 1 cup of coarse sand per square foot to break up compaction.
Root Ball Handling: When removing hellebores from their nursery pots, I never pull them by the stems—always grasp the root ball gently. Circling roots (where roots grow in tight circles around the pot) are a common issue that strangles new growth. Use your fingers to gently tease them apart before planting, just as Step 2 suggests. This one step prevents years of stunted growth.
Mulch Color Strategy: The light-colored mulch recommendation in Step 3 isn't just about aesthetics—it's a heat management tactic. Dark mulches absorb sunlight and raise soil temperatures, which can stress hellebores in summer. Light-colored options like pine bark fines or straw reflect heat while still suppressing weeds. I apply mine in two 1.5-inch layers rather than one 3-inch layer to maintain proper airflow around the crown.
Winter Protection Layering: For Zone 3 gardens, I build winter protection in stages. First, I add the 4-inch mulch layer as instructed, then top it with 6 inches of evergreen boughs (like pine or spruce) to create an insulating blanket. The boughs shield against wind while allowing some airflow to prevent rot. In extreme cold snaps, I add a thin layer of frost cloth over the crown—just enough to protect without suffocating the plant.
Pro Tips for Helleborus Ice N Roses Picotee
- These subtle details make all the difference between a struggling hellebore and one that thrives year after year.
- Soil Test Matters: Before planting, I always do a quick soil test using the 30-minute water drainage trick mentioned in Step 1.
- Root Ball Handling: When removing hellebores from their nursery pots, I never pull them by the stems—always grasp the root ball gently.
Frequently asked questions
Got questions about Helleborus 'Ice 'N Roses Picotee'? You’re not alone! This stunning winter-blooming perennial is full of surprises—here are the answers to the most common queries to help you grow with confidence.
How cold can Helleborus 'Ice 'N Roses Picotee' tolerate?
Helleborus is a winter warrior! This variety thrives in USDA Zones 3–9 and can handle light frosts down to 10°F (-12°C). Just ensure it’s planted in well-draining soil to prevent root rot from lingering moisture. Mulch lightly in extreme cold for extra protection.
When does it bloom, and how long do the flowers last?
Expect late winter to early spring blooms (February–April, depending on your climate). The delicate picotee flowers can last 6–8 weeks with proper care—deadhead spent blooms to encourage reblooming. For a second flush, fertilize lightly in early fall.
Why aren’t my Helleborus flowers opening?
Don’t panic! These blooms often wait until temperatures rise (above 50°F/10°C). If flowers stay closed, check for:
- Too much shade: They need partial shade (3–6 hours of dappled light).
- Overwatering: Keep soil moist but not soggy—they hate wet feet.
- Late planting: Established plants (2+ years old) bloom better.
Can I grow Helleborus in containers?
Use a 12–14" pot with well-draining mix (add perlite or sand). Choose a container with drainage holes and place it in a protected spot (e.g., against a north-facing wall). Repot every 2–3 years to refresh the soil.
What are some great companion plants for Helleborus 'Ice 'N Roses Picotee'?
Pair it with early spring bloomers for a showstopping display:
- Crocuses (for height contrast)
- Fern allies (like Asplenium) for texture
- Pulmonaria (lungwort) for foliage interest
- Heuchera (coral bells) for color
Are hellebores toxic to pets or kids?
Yes, all parts of Helleborus are toxic if ingested, containing protoanemonin. Symptoms in pets/kids may include drooling, vomiting, or diarrhea. Keep plants out of reach and wash hands after handling. If exposure occurs, contact a vet or poison control immediately.
Wrapping up and next steps
Helleborus Ice 'N Roses Picotee is a true winter marvel—elegant, resilient, and bursting with charm even when frost bites the air. Whether you're a seasoned gardener or a new plant enthusiast, these delicate blooms prove that beauty thrives in the coldest seasons. 🌸❄️
Ready to bring this frost-defying magic to your garden or home? Start by gathering your supplies and planning where these stunning flowers will shine brightest. Your winter garden (or windowsill) will thank you!
- Pro tip: Share your progress with fellow plant lovers—inspiration spreads faster when we grow together! 🌱💬