
Planting
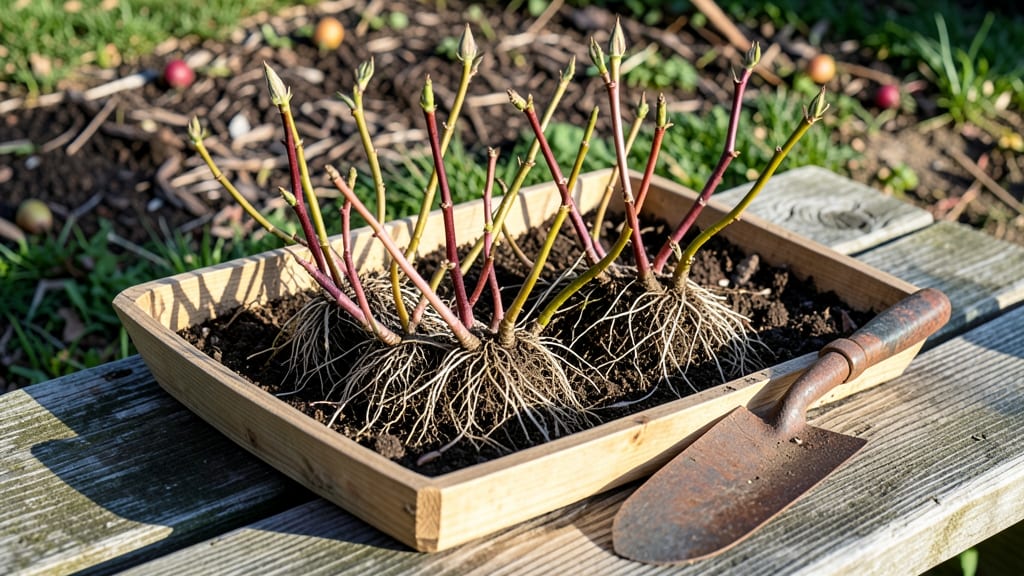
Transplanting roses in the fall can save your struggling plants—or turn a bare spot into a showstopper. 🌹 The key is timing: late fall (after first frost but before hard freeze) gives roots time to settle without winter stress.
I’ve moved roses this way three seasons running, and my bushes now bloom earlier and bigger than ever.
Preparation is everything—amend the soil with compost, prune back one-third of the plant, and water deeply the day before moving. Dig a hole twice as wide as the root ball but no deeper, then protect the roots with burlap if transplanting in colder zones.
The goal? Minimize shock while letting roots establish before winter.
After transplanting, mulch heavily (3–4 inches) to insulate roots and keep moisture steady. In zones 5–7, a burlap wrap around the root ball adds extra insulation.
You’ll see new growth by spring, and the plant’s energy will focus on root development instead of blooming—leading to stronger stems and more flowers next season.
Regional tweaks matter: In Zone 8+, transplant in early fall (September–October) to avoid winter rains. In colder zones, wait until dormancy (November) to prevent freeze damage. Just avoid moving roses when soil’s still warm—they’ll think it’s spring and bolt, leaving you with weak growth by winter.
📚 In This Guide
- What you need
- Instructions
- Tips and common mistakes
- Wrapping up and next steps
What you need
- ● Shovel or spade: A sharp, sturdy digging tool (18–24" deep) to loosen roots. Bonus: A transplant spade (with a narrow blade) for precision!
- ● Pruning shears or loppers: Sterilized (rubbing alcohol wipe) to trim dead/damaged canes and roots. Bypass pruners (for clean cuts) are ideal.
- ● Garden hose or watering can: With a spray nozzle for gentle hydration. Pro tip: Water at least 1–2 gallons per plant post-transplant!
- ● Organic mulch: 2–3 inches of shredded bark, straw, or pine needles to retain moisture and insulate roots.
- ○ Compost or well-aged manure: 5–10 lbs per plant to enrich the new soil. Optional: Mix in bone meal (1 lb) for phosphorus boost.
- ● Rose fertilizer (balanced or low-nitrogen): 10-10-10 or 5-10-10 formula. Apply lightly (½ cup per plant) after transplanting.
- ● Garden twine or stakes: 4–6 ft wooden or metal stakes + twine to support tall/weak stems during recovery.
- ● Gloves: Heavy-duty gardening gloves to protect hands from thorns and soil.
- ● Root stimulator: Mycorrhizal fungi or seaweed extract to encourage root growth.
- ● Soil test kit: Check pH (6.0–6.5 ideal) and adjust with lime or sulfur if needed.
- ● Black plastic sheeting: 12" x 12" squares to smother weeds in the new planting area.
- ● Anti-transplant shock spray: Hydrogen peroxide (3%) or willow water to reduce stress.
Instructions for transplanting roses in the fall
Fall is the perfect time to move roses—here’s how to do it with minimal stress for your plants.
🌱 Step 1: Choose the Right Time for Transplanting
Transplant roses when daytime temperatures drop to 60-70°F and nights stay above 40°F. This typically falls 4-6 weeks before your first hard frost, usually late September through mid-October in most climates. The goal is to give roots time to establish before winter dormancy.
Watch for the first signs of new growth slowing down—this is your cue that the plant is preparing for winter. If you transplant too early, the rose may focus on new top growth instead of root development. Too late, and roots won’t have enough time to settle before cold weather sets in.
☀️ Step 2: Prepare the New Location and Soil
Pick a spot with full sun (at least 6 hours of direct sunlight daily) and well-draining soil. Roses hate soggy roots, so avoid low-lying areas where water pools. Amend the soil with 2-3 inches of compost mixed into the top 12 inches of soil to improve fertility and drainage.
Dig a hole twice as wide as the root ball but only as deep as the container or root system. Loosen the sides of the hole with a shovel to encourage root spread. If your soil is heavy clay, mix in sand or perlite to improve aeration. The new location should mirror the growing conditions of the old site as closely as possible.
🪴 Step 3: Dig Up the Rose Carefully
Water the rose deeply 1-2 days before transplanting to reduce stress on the roots. On moving day, dig a trench around the rose 12-18 inches away from the stem, going down to the depth of the root ball. Use a sharp spade to cut through roots at the outer edge of the trench, then gently lift the entire root system out of the ground.
Shake off excess soil to inspect the roots. Trim any damaged or circling roots with clean pruners, but leave healthy roots intact. If the rose is root-bound (roots circling tightly in the container), use your fingers to gently tease them apart. This encourages outward growth once replanted. Handle the plant by the root ball, not the stems, to avoid damaging the branches.
💧 Step 4: Replant and Water Thoroughly
Place the rose in the prepared hole so the graft union (the bump near the base of the stem) sits 2-3 inches below soil level. This protects the graft from freezing and encourages strong regrowth. Backfill the hole with the amended soil, tamping gently as you go to remove air pockets. Water deeply until the soil is evenly moist to 12 inches down.
Add a 2-3 inch layer of mulch around the base (but not touching the stem) to retain moisture and insulate roots. Use organic mulch like wood chips or straw. Water again lightly to settle the mulch. Avoid overwatering now—you want the roots to establish without sitting in soggy soil.
✂️ Step 5: Prune and Protect for Winter
After transplanting, trim back any damaged or weak stems by one-third to reduce stress. Remove any suckers (shoots growing below the graft union) to keep energy focused on root growth. Avoid heavy pruning—save major cuts for early spring. Apply a 2-3 inch layer of mulch around the base (but not touching the stem) to retain moisture and insulate roots.
If your climate experiences freezing temperatures below 20°F, wrap the rose with burlap or frost cloth after the first hard frost to protect it through winter. Remove the wrap in early spring once new growth appears. Monitor the plant weekly for signs of stress, like wilting or yellowing leaves, and adjust watering as needed—fall transplanting is all about balance.
Tips & tricks for stress-free rose transplanting in fall
Fall transplanting can be a game-changer for your roses—here’s how to avoid common pitfalls and set your plants up for success.
Timing is Everything: The 60-70°F daytime temperature window is non-negotiable for fall transplanting. If your mornings dip below 40°F consistently, delay until temperatures stabilize. I’ve seen roses struggle when transplanted too early—they’ll focus on new top growth instead of root establishment, leaving them vulnerable come winter. Check your local frost dates and aim for 4-6 weeks before the first hard frost for the perfect balance.
Soil Prep Makes All the Difference: That 2-3 inches of compost in the top 12 inches of soil isn’t just about nutrients—it’s about creating the ideal environment for roots to spread. If your soil is heavy clay, mix in sand or perlite to prevent compaction. Pro tip: Test your soil’s moisture level before digging—it should feel like a damp sponge, not mud. Overly wet soil can suffocate roots during transplanting.
Root Care is Critical: When you dig up your rose, treat those roots like delicate glassware. Shake off excess soil to inspect for damage, but don’t scrub—just gently wash away dirt with a hose if needed. If roots are circling tightly (root-bound), use your fingers to tease them apart. I’ve seen gardeners accidentally sever healthy roots with pruners—only trim the damaged ones. The goal is to encourage outward growth, not create more stress.
Winter Protection Starts Now: That 2-3 inch layer of mulch isn’t just for looks—it’s your rose’s winter blanket. Apply it right after transplanting to insulate roots from temperature swings. For climates below 20°F, don’t wait for the first frost to wrap your rose. Burlap or frost cloth creates a microclimate that prevents freeze-thaw cycles, which can be more damaging than cold alone. Monitor weekly for wilting or yellowing leaves—these are signs of stress you can address early.
Pro Tips for Can You Transplant Roses In The Fall
- Fall transplanting can be a game-changer for your roses—here’s how to avoid common pitfalls and set your plants up for success.
- Timing is Everything: The 60-70°F daytime temperature window is non-negotiable for fall transplanting.
- Soil Prep Makes All the Difference: That 2-3 inches of compost in the top 12 inches of soil isn’t just about nutrients—it’s about creating the ideal environment for roots to spread.
Frequently asked questions
about transplanting roses in the fall—because even the best gardeners need a little guidance! Here are answers to the most common queries to help you relocate your roses with confidence.What’s the best time of fall to transplant roses?
Transplant roses 4-6 weeks before your first hard frost (typically mid-September to early November, depending on your climate zone). This gives roots time to establish before winter dormancy. Avoid transplanting too late—fragile new roots won’t survive freezing temps!
Can I transplant roses in late fall or winter?
Nope! Late fall/winter is a hard no—roses need at least 6 weeks of warm-ish soil (above 40°F/4°C) to recover. If you miss the fall window, wait until early spring (as soon as soil is workable) to avoid stressing the plant.
Do I need to prune roses before transplanting?
Yes! Prune 1/3 of the plant’s height (or to 18-24 inches) before digging. This reduces stress and encourages root growth. Avoid heavy pruning after transplanting—wait until spring for major cuts. Pro tip: Sterilize pruners with rubbing alcohol to prevent disease!
How often should I water transplanted roses in fall?
Water deeply 2-3 times per week (or daily if soil is dry) for the first 4-6 weeks after transplanting. After that, taper to once a week unless your area is experiencing drought. Mulch heavily (3 inches) to retain moisture and insulate roots.
What if my transplanted rose leaves turn yellow or wilt?
Yellow leaves or wilting can signal transplant shock, root damage, or pests. Check roots for rot (soft, mushy = bad) or aphids/mealybugs. If roots are healthy but wilted, water deeply and avoid fertilizing for 4-6 weeks. For pests, spray with neem oil or insecticidal soap.
Can I transplant roses in containers instead of the ground?
Containers are great for smaller varieties or areas with poor soil. Use a well-draining mix (50% potting soil, 30% compost, 20% perlite) and a pot 2-3 inches wider than the root ball. Move containers to a protected spot (like a garage or insulated wrap) if temps drop below 20°F (-7°C).
Wrapping up and next steps
Transplanting roses in the fall can be a rewarding way to refresh your garden while giving your plants a head start on spring growth.
By following the right timing, preparation, and aftercare steps, you’ll help your roses thrive in their new home. Don’t let hesitation hold you back—grab those gloves, dig in, and enjoy the beauty of your blooms next season!
Ready to take the next step? Mark your calendar for early fall, gather your supplies, and start planning your rose relocation today. Your garden (and future flowers!) will thank you. 🌹